
If you’re struggling with getting the perspective right when you’re drawing buildings, take it from me, you’re not alone. I’ve been drawing buildings in urban scenes and country scenes for decades, and my success in achieving credible perspective has been unreliable. It may look okay by the end, but some days the mental gymnastics I go through to get there feel excessive. Focus and effort have not guaranteed success despite having studied lots of art instruction books on how to draw accurate perspective. The ease eluded me… that is until now.
To get you up to speed, there are two lines you need to understand. Together, ironically, they create a “plus sign,” always a good place to start, right?
The Eye-Level Line
First, establish your eye-level line. Forget the word “horizon” for a minute. You can’t always see the horizon, but you can always:
- look straight ahead of you, whether standing or sitting,
- pretend your eye has the power of a laser beam,
- then, looking straight ahead, burn a dot in the closest object directly in front of you.
Next, imagine a horizontal line going right through your dot. This will be your “horizon,” or eye-level line, for this one drawing. Now you see that “the horizon” is not actually a thing or a place; it’s a point of view! Who knew!
Some artists call it an eye-line. Either way, you’ve nailed it. Decide early on, before you draw this line, whether you want to be sitting or standing, because your laser beam point changes when you change levels. Remember, your legs and neck may get tired holding the same position for a long time, so get comfortable before you commit to a viewpoint.
Okay, now that you found your dot, extend that line left and right with your eyes first, and then faintly draw that line on the page.
You’ve made your first mark! On to Line #2! This is getting exciting!
Line #2: The Main Vertical
Next, look for the closest corner of the nearest building. Decide where you want that line to be on your paper (avoid dead center: there’s a reason it’s called “dead” center!).
Now draw it lightly. You’re on a roll with that one vertical line. This is where most perspective classes start talking about vanishing points, roof angles, window angles, and suddenly you’re up in your head instead of staying firmly grounded in Eyeball Land. (My book is called “Look at That!” not “Let’s Think About This Until We’re Totally Confused”!)
Let’s get back to that first vertical line. Now that you know where it intersects your eye-level line, how much of it is above eye level, and how much is below? More than likely, the “above” part is much longer than the “below” part because from eye-level to the ground is usually less than 6 feet, but the above eye-level part is often10, 20, 30 or more feet. So take a minute and make that line look right. You’ve accurately completed Line #2!
Now, find the next vertical line to the left or right of Line #2. It’s probably another building corner. How far to the left (or right) is it? Is it fairly close? Take your time, you’re making friends with your subject matter.
Now that you know how far to the left (or right) it is, put a dot on the eye-line to show where you’re “planting” your Line #3. Now, how tall above the eye-line is it, compared to your first line? How far below eye-level does it go? Don’t think about it, just notice, just look and compare. You can say, “Hmm…” if you want, like I do all the time. It seems to help.
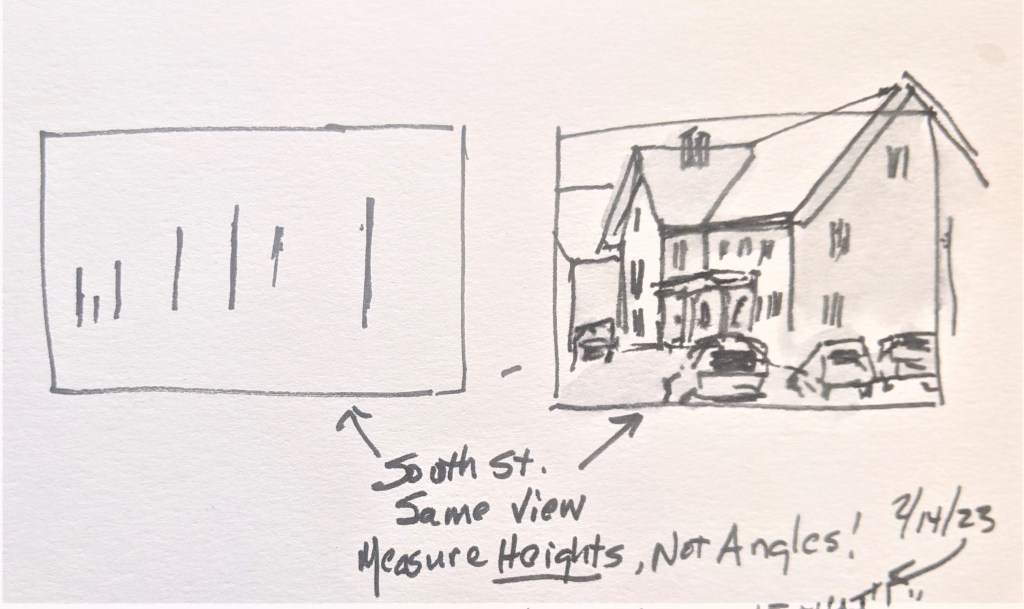
Create all the main verticals from one side of your sketch to the other. Your fence posts are now planted. It will look something like this:
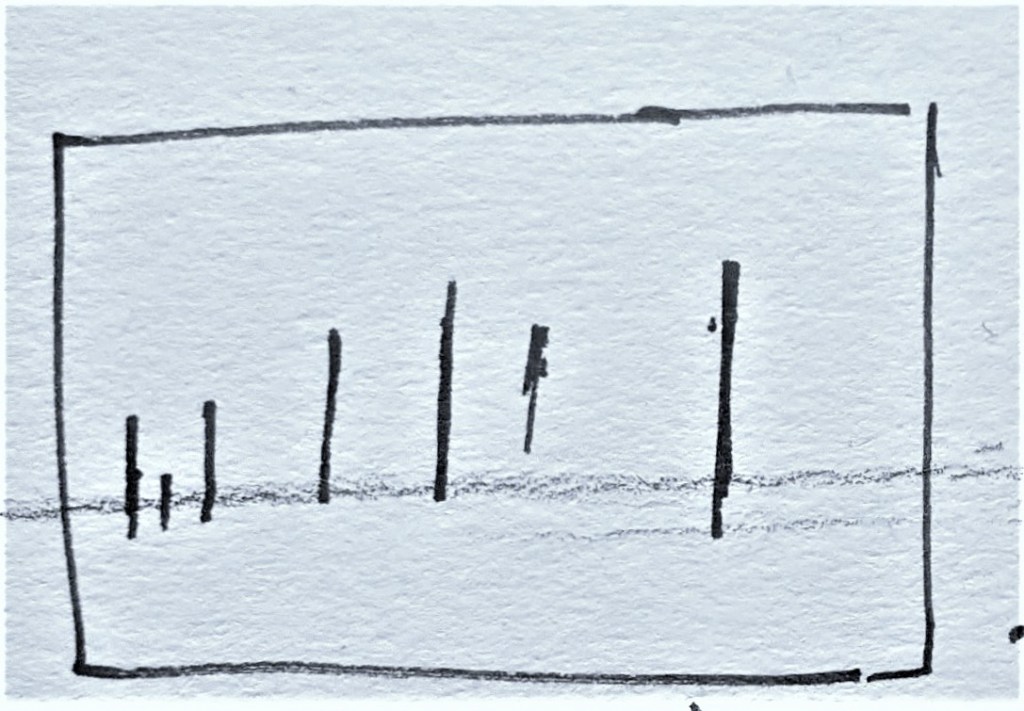
You could stop right now and be very proud of yourself. Amazing, right?
But if you’d like to continue, start connecting the tops of those lines carefully, one by one. Keep looking back at your subject, and notice how these new lines (rooflines if you have a flat-roof building) are automatically perfect, or close to it. Voila! No stressing over perspective, no vanishing points. All you did was ask yourself, “Is this line taller or shorter than the one next to it, and by how much?” You were just planting fenceposts and hammering them in.
If you feel like it, now that you have a credible building, you can add whatever details you want, like the porch, or a few windows, or even a car or two. Make these minor shapes simple, no perfectionism. Like this:
Then in a couple of days you might find yourself out for a walk, looking down a street that was too complicated to sketch in the past. Not now!
If you forgot your sketchbook, take a moment just to discover all those lovely verticals you never noticed before. Let your confidence grow. If you do have your sketchbook, you might decide to just draw the eye-level line and all the verticals, the fenceposts. No houses, just posts. Use a pencil if you like, so you can erase the tops of any posts that get too tall. Then add whatever rooflines you like. And a shrub or two. Then quit halfway through because you’re pleased enough, and your fingers are freezing. That’s what I did.

When I see a student’s sketch that has wildly inaccurate perspective, nine times out of ten the only problem is that their fence posts are too tall above the eyeline, too short below the eyeline, or not spaced properly on the eye-line.
It’s all about relationships, not angles.
So now you know the secret: there are three basic steps to rendering perspective accurately.
1) Plant your fenceposts the correct spacing apart,
2) then dig the hole to the right depth (below the eye line),
3) and finally, be sure they’re the right height (above the eyeline).
You simply can’t go wrong. Before long, your draftsmanship will be so solid that you can add in color and really have some fun.

By the way, this approach expands on the “GPS dots” idea I introduced on pages 42-43 of Look at That! In this blog episode, we simply add the “fenceposts” those GPS dots are sitting on! I hope this helps build your confidence, and above all, increases your joy in seeing and sketching.
Do me a favor: I would love to know if this made sense to you, if you tried it out, and if it felt like it helped. In no time at all, you will start seeing street scenes as a collection of verticals, all linked together by those no-longer tricky angles. Some fun now!
*******
Your generous or humble contribution to The Tip Jar helps keep this website solvent and is very much appreciated!
As always, feel free to forward this post to anyone you think might enjoy it.
Questions? Comments? Public comments can be posted below.
Private questions or comments will reach me by using the Contact link here.
And, as always, thanks for joining me in some time “aloft”!

Great advice! Sometimes people can get really stressed about perspective, but you’ve made it easy. Thanks
LikeLiked by 1 person
Thanks Andy, that means so much coming from you. I frequently recommend your great Udemy courses for the exact same reason. Our job is simply to open the door wider for anyone interested. 🙂
LikeLiked by 1 person
Yowzers! This is fantastic Bobbie!
LikeLiked by 1 person