Secret #3 – How wet is your brush?
In all of these secrets we are learning to ask three essential questions:
- Where exactly is the water right now?
- Is there enough water?
- Is there too much water?
You might have the exact right color mix, but until you also have the right amount of water in that mix, you are forced to either shove the parched paint mixture around, or scramble to keep it all from running off your paper. Wouldn’t it be easier and more fun to actually know where all that water is hiding?
Now that you have a watercolor sketchbook (Secret #1), and have pre-wet the paints in your palette (Secret #2), it is time to learn how to inspect your brush.
Secret #3: How Wet is Your Brush? (page 75 in the SECOND EDITION of “Look at That!”)
Your brush is capable of roughly 4 stages of wetness:
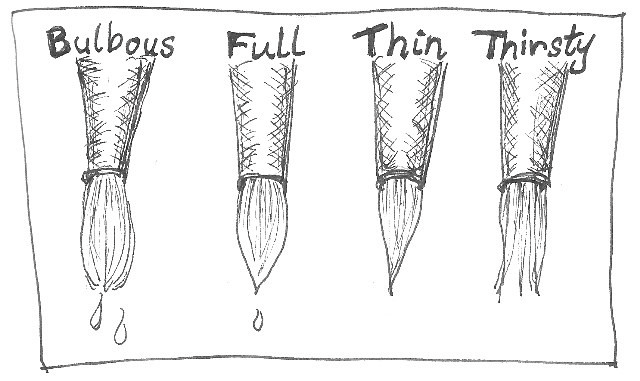
Bulbous: Drips if shaken just a little (great for painting smooth large areas)
Full: Drips with a strong shake (excellent for painting most of the time)
Thin: Unlikely to drip (best for “drawing” fine details with paint)
Thirsty: Brush hairs may even be splayed; it will not drip (can act like a straw, and also create a great variety of textures)
Why do you need to know how wet your brush is?
It will determine how dark/rich your colors can be.
If the center of your brush is full of water (see “bulbous”), there is no room for the paint to get between the hairs of your brush. Bulbous wetness is only used for large, wet, semi-pale washes of color on thick paper.
It will affect your ability to paint a beautiful fine line.
If your brush is “bulbous” or even “full,” those hairs at the very tip will be too water-logged to form a sharp point.
A thirsty brush can do two things no other brush can do.
First, it can act like a straw, lifting excess paint or water off the paper, without disturbing the surface colors much.
Second, it can create gorgeous “dry brush” marks that are great for grasses, sparkles on water, all sorts of things.
Before we paint anything, let’s study together what a brush-tip looks like in all those conditions.
Get a cup of plain water and your big round brush (at least a size 8), then see if you can duplicate these four stages of wetness shown in the illustration. Here’s how:
Swish your brush in the water, carefully lift it straight up, then look at it closely, especially the tip.
Does it look like it’s bulging with water?
Gently tap it once on the side of the cup, or touch it to a towel. Does it now look more like the “full” or maybe even the “thin” illustration?
Finally, squeeze it dry with a towel, then smush the hairs: voila thirsty! Now you know important brush secrets!
How was that? We will move on to mixing water with paint soon, I promise, but for now if you know how to recognize how full your brush is, you are way ahead of many beginning (and even experienced) watercolorists. Kudos to you!
~~~~~
*** If you would like to purchase a copy of “Look at That! – SECOND EDITION” be sure to look for the version with the green stripe down the left side of the cover, and the words “SECOND EDITION” in the blue cloud at the top of the cover. The best shortcuts to find this new book are below: simply click on whatever version you prefer.
“Look at That! – SECOND EDITION”
Feel free to forward this post to anyone you think might enjoy it.
If you find these posts valuable, please consider making a contribution to The Tip Jar. It is a secure site, it helps keep me and this website solvent, and is greatly appreciated!
Questions? Comments?
Public comments can be posted below.
Private questions or comments will reach me by using the Contact link here. And, as always, thanks for spending some time “aloft”!
